How to Install Linux (Ubuntu) on Windows 10
Ready to install Ubuntu Linux on your Windows system? Well, you made the right choice. There are 2 ways to do it and here they are.
Windows users are increasingly trying out Linux and there is a good reason for that. If you have also decided to give the system a try, there are two ways you can go about it.
You could use the Windows Subsystem for Linux (WSL) to install an Ubuntu command line on your Windows 10 PC. This lets you have Ubuntu tools that run like a native app. Or you could install Ubuntu alongside Windows and select which OS to boot at each system startup.
Option 1 is the easier of both, but you currently can’t use it to run graphical programs such as a web browser. This makes it only ideal for programmers who need to test their code in a Linux environment.
With Option 2, however, you’ll have more work to do, but you’ll also end up with more choice and control over your computing hardware. So, make your choice, and let’s get to work.
Table of Contents
hide
Windows Subsystem for Linux Setup
Windows now makes it possible to experience the power of Ubuntu Linux on your machine. The process is simple and you get to use some of the most popular Linux tools, such as SSH, as though it was a native app.
Its only drawback is the current lack of support for graphic UI programs, although Microsoft has promised that it’s coming.
1. Requirements
All you need for this installation to work is an x86 PC that’s running an updated version of Windows. This should include the Windows 10 Fall Creators update from 2017 at the very least to run WSL 1. If you would like to run WSL 2, then you’ll need the Windows 10 May 2020 update or newer installed.
2. Enable Windows Subsystem for Linux
Once you’ve got the requirements sorted out, you’ll need to enable WSL first. To do that, fire up your PowerShell as an administrator and enter the following:
dism.exe /online /enable-feature /featurename:Microsoft-Windows-Subsystem-Linux /all /norestart
for WSL 1. If you prefer to install WSL 2, then enter:
dism.exe /online /enable-feature /featurename:VirtualMachinePlatform /all /norestart
After the entry, you’ll need to restart your computer.
3. Begin the Installation
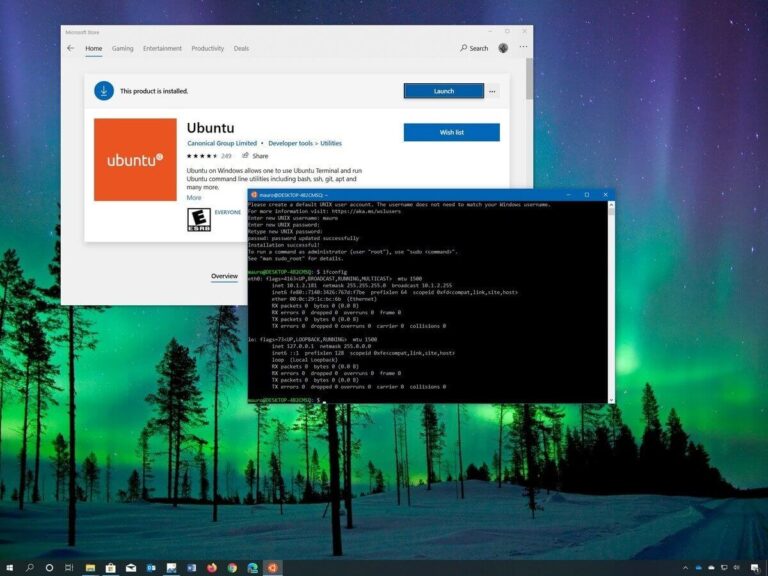
After your system restarts, click the Start menu, and launch the Microsoft Store app. Once you are there, search for Ubuntu and click install to begin the program download and installation.
4. Launch your Windows Terminal
Once the installation is over, your Ubuntu Linux terminal will now be available to you like any other Windows program, and this means you can search for or launch it from the Start menu.
You should note, however, that the program will require a username and password the first time you run it. These don’t need to match the ones for your Windows 10 installation, so feel free to enter something else.
That is it. You can now enjoy the power of Ubuntu Linux from your Windows 10 environment.
Dual-boot Installation Steps
If you would like to run a fully functional Ubuntu Linux installation on the other hand, then you will need to install a full Linux operating system on your machine.
You will need a USB flash drive with at least 2GB storage, although 8GB or higher is the recommendation for newer Ubuntu versions. The system also has its minimum system requirements, but if your PC already runs Windows 10, then you should be fine.
The good news here is you don’t need to delete your Windows installation. You can install Ubuntu Linux alongside Windows 10 and select which of the two systems to boot at every start.
Here is how to do it:
1. Decide on the Ubuntu Flavor
There are many flavors of Ubuntu Linux. These flavors are different configurations, Desktop environments, and software packages that offer customized Ubuntu versions for different users.
For instance, asides from Standard Ubuntu, there is Lubuntu for those who need a lightweight install, Kubuntu for lovers of aesthetics, Ubuntu Studio for music and video fans, and Ubuntu Kylin for Chinese users.
There are others as well, so check out ubuntu flavours to find and download your flavor.
2. Download the ISO Image File
After you have found your flavor, your next step should be to download the respective ISO image file because each flavor has a different installation image file.
3. Make a Bootable Live CD
Head over to Pendrivelinux to download the Universal USB Installer. Or you can use the Rufus program.
Both programs will copy the ISO image you downloaded into your USB drive and additionally make it bootable. This makes it possible to run the Ubuntu Linux installer when your PC boots.
Usage is simple and similar for both programs. Just run the program, plug in your USB stick and select it in the program, then select the ISO image file you just downloaded and click Start. Your bootable Live CD should be ready in a few minutes.
4. Partitioning
Here is where you should make a backup copy of your files. This is recommended whenever you are about to tamper with a computer hard-drive, although in 99% of cases, nothing bad ever happens. But that’s as long as you don’t interrupt the program during its partitioning process.
To partition your hard disk, you can either use the Windows built-in Disk Management Tool or use gparted on your Ubuntu Linux installation disk.
To use Windows’ Disk Management Tool, right-click on the drive you want to partition and select “Shrink Volume”. Ubuntu needs at least 10GB of disk space, although you could still install it on less. But 25GB or higher is the standard recommendation.
If you want to do this with gparted, then don’t worry, the installation program will give you a chance to do it when the time comes. Just keep in mind to never interrupt the partitioning process once it starts, because the results can be random.
5. Enable Installation
Before you start the installation, you may need to disable secure boot on your machine. This is a UEFI security feature that prevents the PC hardware from booting other software other than the system installed on it by the original manufacturer.
It helps to prevent root-kits from hijacking your system, but it also makes it impossible to dual-boot Windows with Linux.
You can simply disable it by restarting your system and pressing either F1, F2, F12, or Esc (depending on your machine) to enter the BIOS/UEFI settings page. Then find the Secure Boot option in the security or boot tab, and disable it.
Also, make sure your system will check for a bootable USB stick before attempting to boot from the hard-disk. So make sure USB is before HDD in the boot sequence of your BIOS/UEFI configuration. Then save and exit.
6. Run the Installer
When your system restarts and everything goes well, the Ubuntu Live CD will start and ask if you want to try Ubuntu or Install it straight away. You can choose any option here because there’s still another installation option on the Live CD desktop.
The most important part of this installation is Windows detection. The installer will detect your Windows installation and offer you the choice to install Ubuntu alongside Windows. If it doesn’t do this, then something’s not right with your Windows system. So, check first before continuing.
The second most important part is the hard-disk partition. If you shrank your disk in Windows, then Ubuntu will detect the free partition and allow you to select it for installation. If you didn’t resize your disk, then it will offer you the chance to shrink it now before moving on.
Be warned, however, that all changes are permanent.
The rest of the installation is easy and you will just need to go along, adding your preferences and user credentials.
7. Dual Boot
You can now dual-boot your system. At every start, the grub boot-loader will ask if you want to boot into your Windows 10 or Ubuntu Linux system.
Just select whatever you need and move on. That’s it.
Conclusion
There are many advantages to having an additional Ubuntu operating system on your Windows machine and as the above instructions have shown, it’s not too difficult to achieve.
Of course, both methods are not as flexible as virtualization, but then, they give you full access to your machine’s hardware, while offering you the best of both worlds. Something virtualization can never offer you.

Related Articles