Bunny.net review, pricing, WordPress set up and every detail (BunnyCDN)
BunnyCDN is a fast and cheap Content Delivery Network. It has amazing features and mostly outperform KeyCDN and StackPath. Find out how to integrate it with WordPress and more
Apart from using a good Web hosting company and using a good theme, the next thing that can speed up website tremendously is CDN.
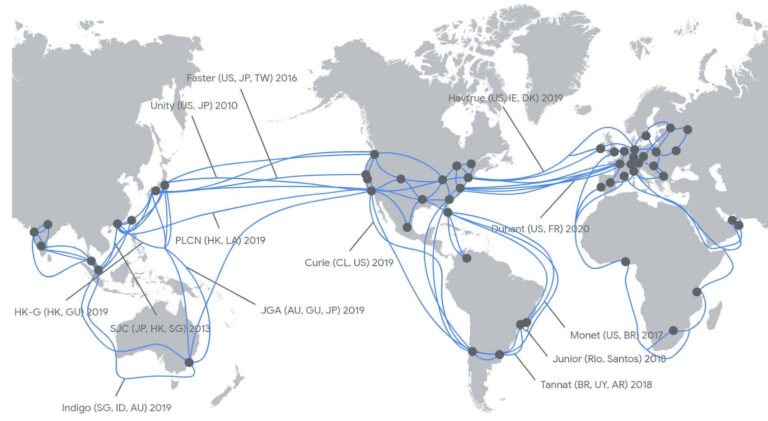
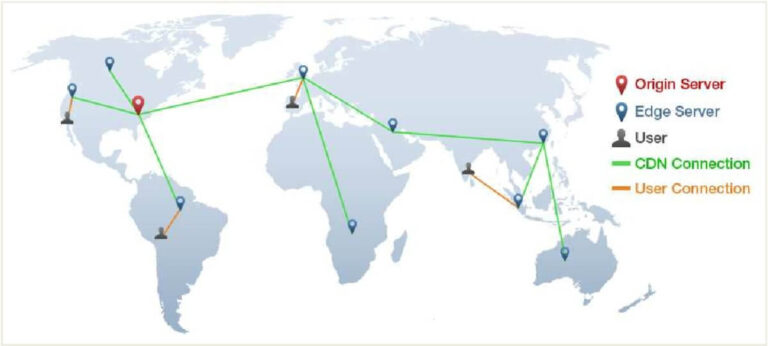
CDN speeds up a website by making many static copies of the website, then distributing these copies around the world and finally serving these copies to users from a location closer to them.
I love CDN; they have served me so well. But most of them are expensive! So I have always used Cloudflare which offers a good free plan and it has served me so well. But recently I discovered Bunny.net, a very fast CDN that is cheap.
Here is a review of BunnyCDN, it’s performance, pricing, comparison and all you need to know.
Table of Contents
hide
What is Bunny.net (BunnyCDN)?
Bunny.net, formerly known as BunnyCDN is a Content Delivery Network founded in 2015 and based in Slovenia with a team of developers working around the World. With 40 PoPs and presence in 6 continents, BunnyCDN is an elite Content delivery Network.
Like most elite CDN, BunnyCDN boasts of many amazing features including the Bunny Optimizer which can speed up a website. While major CDN like Google Cloud and Cloudflare boasts of a bigger network, as far as pricing in relation to performance is concerned, BunnyCDN is top 3 if not the best.
And as far as delivery of cache-able contents, it does not matter if it is large files or videos, BunnyCDN does a very impressive job.
Bunny.net and WordPress
Bunny.net integrates very well with WordPress and can boost the speed of a typical WordPress website by more than 1.3 seconds. With caching plugins such as WP Rocket and W3 total cache, Bunny CDN can be easily integrated into WordPress. Alternatively, you can use the BunnyCDN WordPress plugin.
If you are using Cloudflare for your DNS, BunnyCDN works well with Cloudflare with no issues.
Key features of Bunny.net
Here are some key features:
- 40 global datacenters
- Presence in six continents including Africa, Asia, Europe, North America, Oceania and South America
- Brotli & GZip
- HTTP/2
- Image optimization
- HTTP streaming
- Video delivery
- Cloud storage
- Free SSL Certificate
- Hotlinking protection
- Block users by country
- Origin shield (security)
- Automatic healing
- NVMe/SSD powered
- Override expire headers
- Bandwidth overdraft protection
- Cache query strings
- Query string ordering
- Edge rules
- Instant cache purging
- Wildcard domains
- Secure token URL authentication
- SSL origin support
- Native S3 Origin Authentication
- Full origin SSL
- Enable or disable any region
- Tier 1 networks
- < 30ms global latency
- Anycast DNS
- 95%+ cache HIT rate
- User-friendly dashboard
- Pull Zone Management
Bunny Optimizer
Bunny Optimizer is a very powerful feature of BunnyCDN that can deliver more speed by automatically compressing and minifying CSS and JavaScript files, also optimizing images on the fly.
If you are obsessed with speed, this is one feature that you will like.
Features of Bunny Optimizer:
- Automatic CSS/JavaScript Minification
- Smart Image Optimization
- Unlimited requests
- On The Fly Image Processing
- Unlimited optimizations
- Unlimited images processed
One of the amazing things it does is that it automatically detects the user’s device type to automatically resize and compress images in the most optimal way possible using WebP
It can also Resize, crop, rotate and edit images with a few simple query strings, completely on the fly with Bunny Optimizer image processing engine
Cloud Storage
BunnyCDN offers an innovative Cloud Storage solution with automatic cross-region replication. The pricing for Cloud storage is $0.01 /GB per month for Europe (Falkenstein), $0.02 /GB per month for North America (New York), $0.03 /GB per month for Asia (Singapore).
Features of Cloud storage
- Direct CDN Integration
- File Manager
- FTP
- HTTP API
- RAID 6 system
- Infinite Scalability
- No Internal Bandwidth Charges
- Security Features
Performance
How fast is BunnyCDN? to determine this, I will be making use of cdnperf.com, an online CDN performance tester.
Here is the result below:
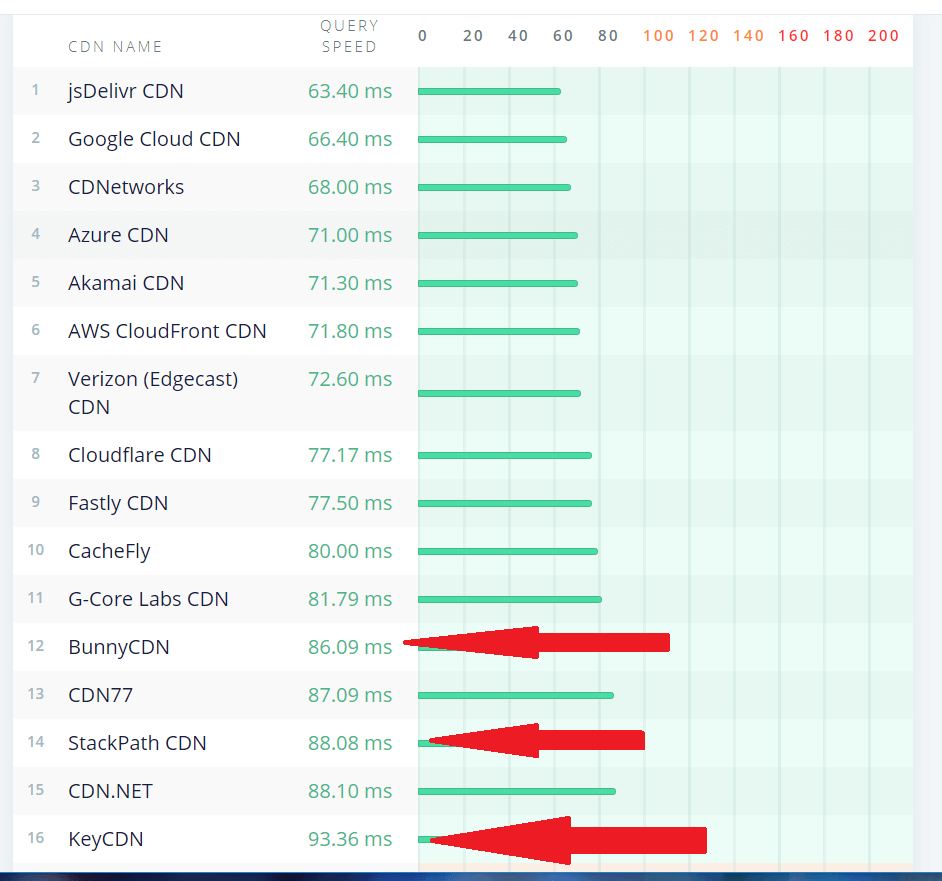
As you can see above, BunnyCDN outperformed KeyCDN and Stackpath which are more expensive worldwide
BunnyCDN Data centers/Network.
BunnyCDN has up to 40 PoPs and here they are:
Africa
- Johannesburg
Asia
- Bangalore
- Israel
- Mumbai
- Seoul
- Singapore
- Tokyo
Europe
- Amsterdam
- Bucharest
- Frankfurt
- Helsinki
- London
- Madrid
- Milan
- Moscow
- Oslo
- Paris
- Prague
- Vilnius
- Warsaw
- Istanbul
North America
- Atlanta
- Ashburn
- Chicago
- Dallas
- Denver
- Los Angeles
- Miami
- New York City
- San Jose
- Seattle
- Toronto
Oceania
- Adelaide
- Auckland
- Brisbane
- Melbourne
- Perth
- Sydney
South America
- São Paulo
BunnyCDN pricing
BunnyCDN offers a Pay As You Go pricing model. Depending on your site and need, you can spend about $1 per month. Or more than that.
The pricing by regions is as follows:
Europe and North America is charged at $0.01/GB
Asia and Oceania is charged at $0.03 /GB
South America is charged at $0.045 /GB
South Africa is charged at $0.06 /GB
With this model, let’s assume that you are using about 20GB bandwidth every month with your traffic coming from Europe, USA or Canada. That will be 20 x 0.01, which is about $0.2 per month!
You can activate or deactivate any region! Let’s say you don’t want to use BunnyCDN for South America because you don’t have much traffic there, with just a click, you can deactivate BunnyCDN for that region.
While it is cheap, there is a minimum recharge per year of $10. That means you must use up to $10 per year.
Bunny Optimizer is priced differently at $9.5 /month per website
As you can see, it is one of the cheapest pricing for a CDN and in terms of performance, has proven to be better than competitors such as KeyCDN and StackPath CDN.
And you can try BunnyCDN for free for 14 days and then decide if it is good enough for you.
How to set up BunnyCDN account
To get started, you need to sign up. This is very easy and straightforward.
The wonderful news here is that you can try it for free for 14 days or until you have used up to 1000GB. No credit card required.
Once you sign up, the first thing you need to do is create your pull zone. It is very easy.
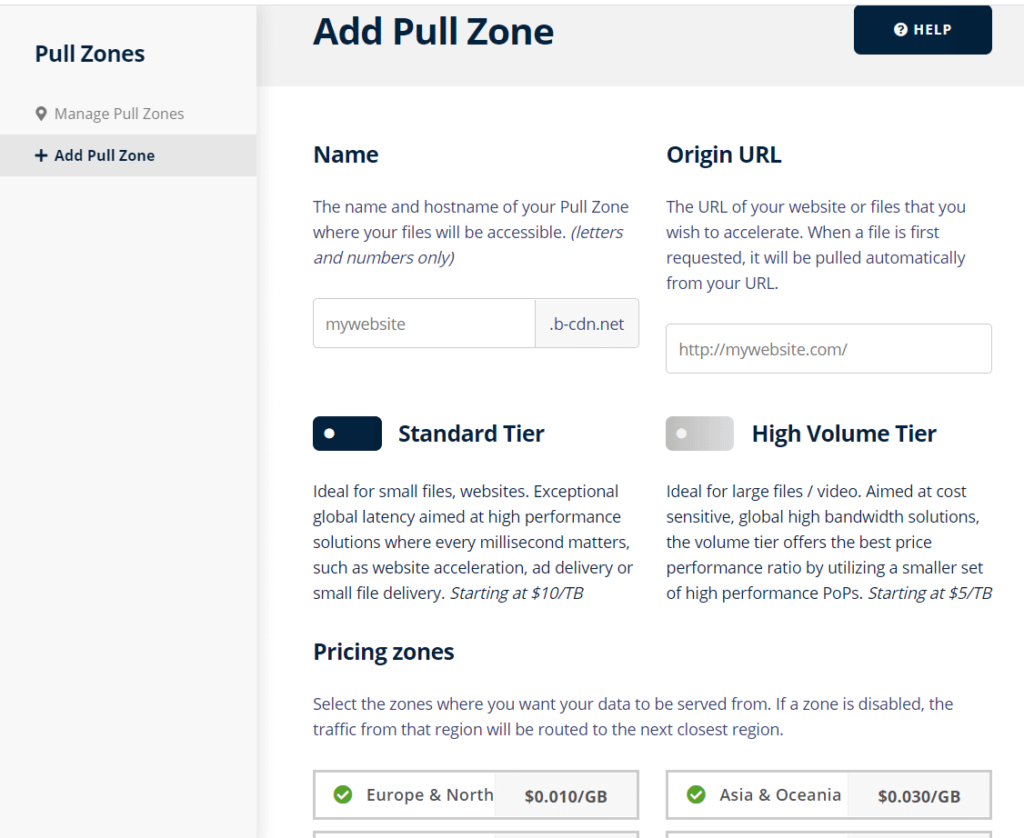
Here is now to configure it.
Name: Here you can add the name of your website. For example, if your website is MyDomain.com, add MyDomain here without the .com
Origin URL: Here you add the full website address. That will be https://MyDomain.com/
Tier: Here you pick the plan. If you are hosting a regular website or blog, pick the standard tier. If you are hosting heavy contents such as videos then pick the high volume tier.
Pricing Zones: Here you can activate or deactivate areas that you want or don’t want CDN coverage. It is best to leave every zone activated unless you know what you are doing.
Once that is done, you are all set. Next part is to integrate it.
How to integrate BunnyCDN with WordPress
After setting up your BunnyCDN account, the next step is to integrate it with WordPress. There are many options to do that. You can use the official plugin or use your caching plugin. I will show you three options below.
How to set up BunnyCDN using the Official BunnyCDN WordPress plugin
On your WordPress Dashboard, go to plugin then click on add new. Search and install BunnyCDN – WordPress CDN Plugin.
After installation, just activate the plugin. Then navigate to plugin settings. Just look at the left sidebar of your dashboard and you will see BunnyCDN, click on it.
You will see a screen like this:

Just enter your Pull Zone Name here. The same one you created. Then click Enable BunnyCDN. That is all.
How to set up BunnyCDN with WP Rocket
From your WordPress dashboard, go to WP Rocket settings. Once the WP Rocket screen open, click on CDN.
Then enter the full host name of the pull zone you set up. Remember to include http or https depending on which one your site is using.
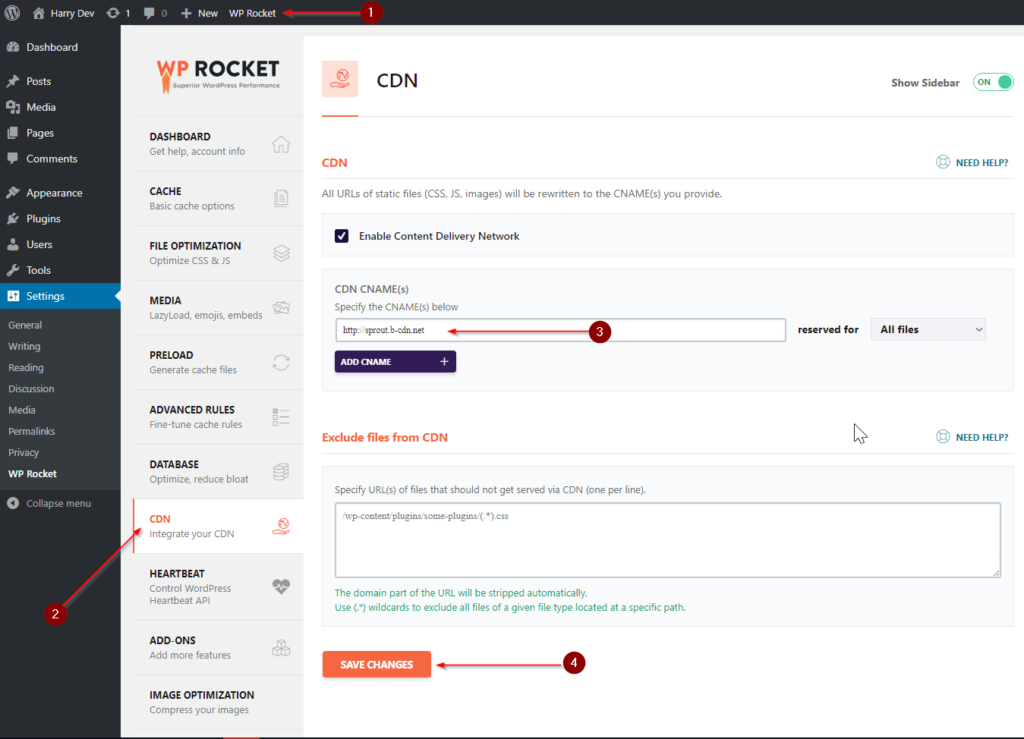
That is all.
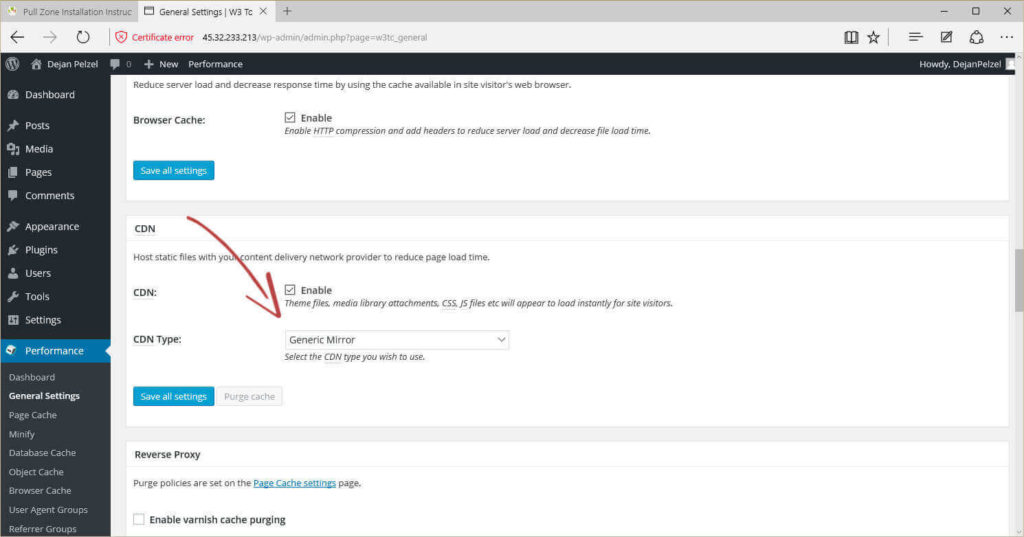
How to set up BunnyCDN using W3 Total Cache
From your WordPress dashboard navigate to W3 Total Cache setting by clicking Performance on the left sidebar of WordPress Dashboard. Once there, click on General settings. Now scroll down to the CDN section. Click on enble CDN. Select generic for CDN type. Save changes.
See this image below if you are confused.
Now go to performance again and under it where you see page cache, minify and others, you will see CDN, click on it.
Scroll down until you get to the configuration section. Enter your host name into “Replace site’s hostname with”
That is all. You are done.
Best settings for Bunny CDN with WordPress
Here are some settings to apply for optimal performance.
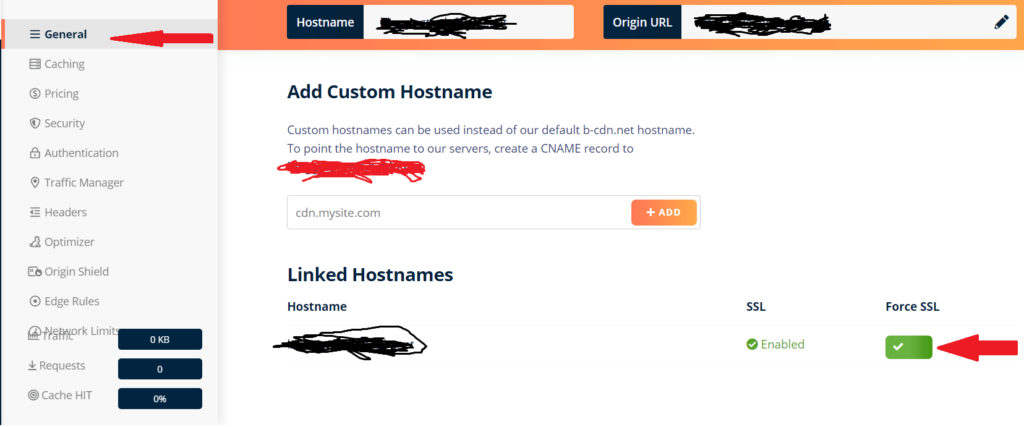
1. Force SSL
Under the general tab, make sure you force SSL. This will resolve every SSL issues or too many redirect issues.
Navigate to pull zone then click on general. Activate force SSL.
2. Activate WebP support
If your site produces WebP images, then ensure that you activate WebP support so that the CDN can serve WebP images to browsers that supports it.
Click on caching, then under vary cache, click to activate Browser WebP support.
3. Add Canonical Headers
Canonical headers can be helpful for SEO optimization. Navigate to headers and activate Add Canonical Headers.
4. Activate Bunny optimizer
As I have listed earlier, Bunny optimizer can make sites faster. To activate, navigate to Optimizer then enable.
5. Enable origin shield
Origin Shield can help reduce the load on your server. To activate, navigate to origin shield then enable.
6. Edge rules
You can add edge rules as you want to optimize your site. You can use this to force SSL, set redirection and more.
To access this feature, navigate to edge rules.
BunnyCDN vs Cloudflare vs KeyCDN vs Stackpath
Here are some comparison between BunnyCDN, Cloudflare, Key CDN and Stackpath.
| BunnyCDN | Cloudflare | KeyCDN | Stackpath | |
|---|---|---|---|---|
| Query speed | 86.09ms | 77.17ms | 93.36ms | 88.08ms |
| PoPs | 39+ | 155+ | 33+ | 44+ |
| Price | Pay as you go ($0.01/GB for North America and Europe) | Free | Pay as you go ($0.04/GB for North America and Europe) | Starting $10/month |
| Image Optimization | Yes for $9.5/month | Yes for $20/month plan | No | No |
| Anti DDoS attack | No | Yes | Yes | Yes |
Frequently Asked Questions (FAQs)
What is BunnyCDN?
BunnyCDN is a Content Delivery Network founded in 2015 and based in Slovenia.
Where are BunnyCDN Datacenters?
They have PoPs on 6 continents. 7 in Africa, 24 in Asia, 34 in Europe, 20 in North America, 6 in Oceania, and 14 in South America
What is BunnyCDN pricing like?
BunnyCDN offers a pay-as-you-go pricing model. Europe and North America is $0.01/GB, Asia and Oceania is $0.03/GB, South America is $0.045/GB, Africa is $0.06/GB
Can I use BunnyCDN with Cloudflare?
Yes, you can, There is no direct conflict. But it is advisable to only use one CDN at a time.

Related Articles