Как установить WordPress на Ubuntu
Хотите установить WordPress на Ubuntu самостоятельно? Если вы любите делать своими руками, читайте дальше, чтобы узнать, как это делается.

Практичность WordPress сделала его любимцем Интернета, на его долю приходится более 30% всех размещенных веб-сайтов в мире, а также 60% господства среди систем управления контентом.
Хотя он начинался как простой в использовании блоггинг платформы, WordPress также вырос, чтобы включить так много функций. И это делает его отличным инструментом для создания многих типов веб-сайтов.
Многие хостинг-провайдеры предлагают установку WordPress в один клик. Но если вы любите делать что-то самостоятельно или просто хотите установить более современную версию, то это руководство для вас.
Предварительные условия: Обновите или обновите LAMP.
Для работы WordPress требуется стек LAMP (Linux Apache MySQL PHP) или что-то подобное. И поскольку у вас есть Ubuntu, которая удовлетворяет требованиям Linux, вам также необходимо убедиться, что другие компоненты установлены и готовы, прежде чем добавлять WordPress. Обратите внимание, что WordPress может работать в Windows, но лучше всего работает в Linux. Кроме того, вы можете заменить Apache альтернативой, такой как Lightspeed. Но это руководство посвящено LAMP.
Вы также можете обновить систему, чтобы убедиться, что вы используете только последние пакеты. Например, по состоянию на январь 2021 года WordPress доступен в версии 5.6 и требует PHP версии 7.4 и выше и MySQL версии 5.6 и выше. В этом руководстве предполагается, что вы используете Ubuntu 20.04.
Чтобы обновить систему Ubuntu, введите следующие команды:
Обновление sudo apt
sudo apt upgrade
Графическая установка против командной строки
Вы можете установить пакеты LAMP и WordPress либо через командную строку, либо с помощью графического инструмента, такого как Ubuntu Software Center. Но обратите внимание, что последнее возможно только в том случае, если вы используете среду рабочего стола Ubuntu.
В этом пошаговом руководстве предполагается, что вы устанавливаете пакеты в серверной среде без графического пользовательского интерфейса.
Если вы находитесь в среде рабочего стола, вы также можете использовать терминал. Или вы можете выполнить шаги с 1 по 3 с помощью Центра программного обеспечения, а затем продолжить установку с шага 4.
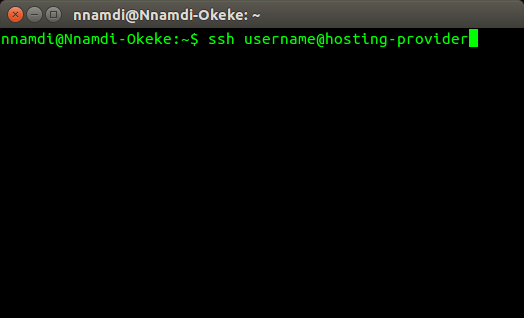
Чтобы войти на удаленный хост, введите:
ssh user@hostname # использовать информацию с вашего хоста
Как установить WordPress на Ubuntu
Выполните следующие действия, чтобы установить WordPress на Ubuntu:
Шаг 1. Установите и настройте Apache
Ничто не работает во всемирной паутине без сервера HTTP (HyperText Transfer Protocol). Итак, вам сначала нужно проверить, работает ли у вас сервер. И если нет, вы устанавливаете один. Мы будем использовать Apache2.
Чтобы проверить, установлен ли Apache, запустите:
sudo systemctl status apache2
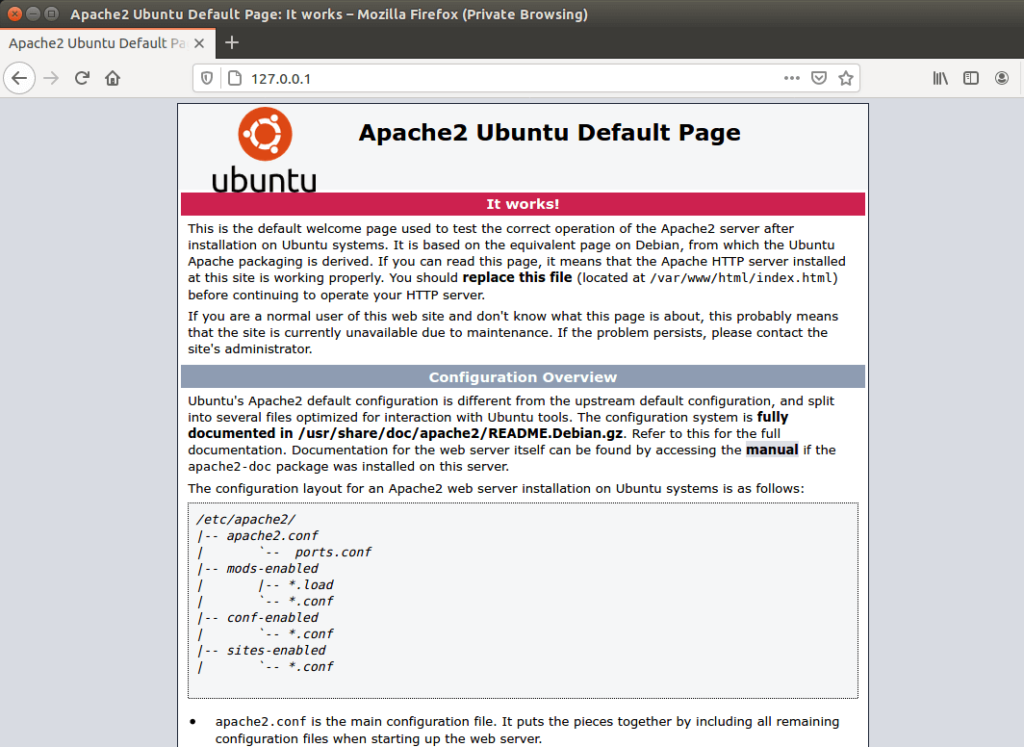
Или введите IP-адрес вашего сервера в веб-браузере. Если Apache находится на локальном компьютере, введите 127.0.0.1 в адресную строку. Вы должны увидеть похожую страницу:
Если Apache не установлен в системе, то установите его с помощью следующей команды:
Обновление sudo apt
sudo apt установить apache2
Затем проверьте приложения, доступные для брандмауэра Ubuntu UFW, используя:
Список приложений sudo ufw
Он должен напечатать что-то вроде:
Доступные приложения:
Apache
Апач полный
Апач Безопасный
OpenSSH
Вы можете разрешить полный трафик HTTP и HTTPS, выбрав «Apache Full», или разрешить только HTTPS, выбрав «Apache Secure». Например:
sudo ufw разрешить «Apache Secure»
Шаг 2. Установите и настройте MySQL
После того, как ваш Apache установлен и запущен, следующим шагом будет установка MySQL. Вы можете сделать это, введя:
sudo apt установить MySQL-сервер
Это установит все необходимое для запуска базы данных на вашем сервере, включая клиент для среды оболочки. Он попросит вас ввести пароль root (администратора), но вы можете либо ввести его, либо оставить его пустым на потом, во время настройки.
После установки защитите установку с помощью следующей команды:
mysql_secure_installation
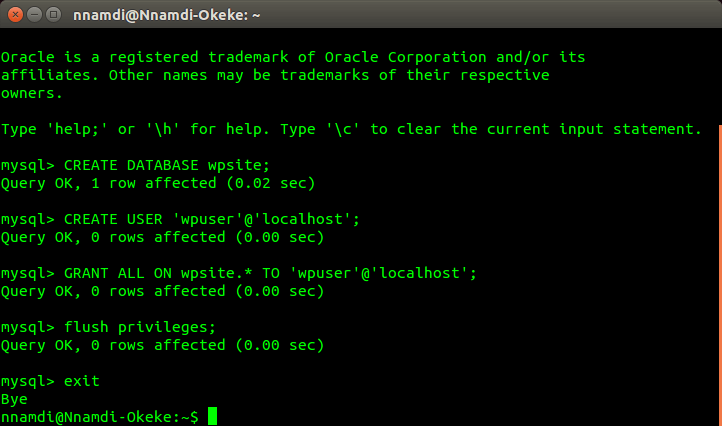
Лучше всего отвечать «да» на все его предложения. Затем войдите в систему с помощью клиента оболочки и создайте базу данных и учетную запись пользователя для WordPress. Вот как вы это делаете.
mysql -u root -p #затем введите свой пароль
mysql> СОЗДАТЬ БАЗУ ДАННЫХ wpsite;
mysql> СОЗДАТЬ ПОЛЬЗОВАТЕЛЯ 'wpuser'@'localhost', ОПРЕДЕЛЕННОГО 'ПАРОЛЕМ';
mysql> GRANT ALL ON wpsite.* TO 'wpuser'@'localhost';
mysql> ПРИВИЛЕГИИ ПРОМЫВКИ;
mysql> ВЫХОД;
Шаг 3. Установите и настройте PHP
Теперь пришло время установить PHP-часть установки LAMP. Это тоже просто, просто введите:
sudo apt установить php php-mysql
Или вы можете сразу установить PHP со всеми его популярными расширениями для запуска WordPress, набрав:
sudo apt установить php php-mysql php-gd php-mbstring php-curl php-intl php-zip php-xml php-xmlrpc php-soap
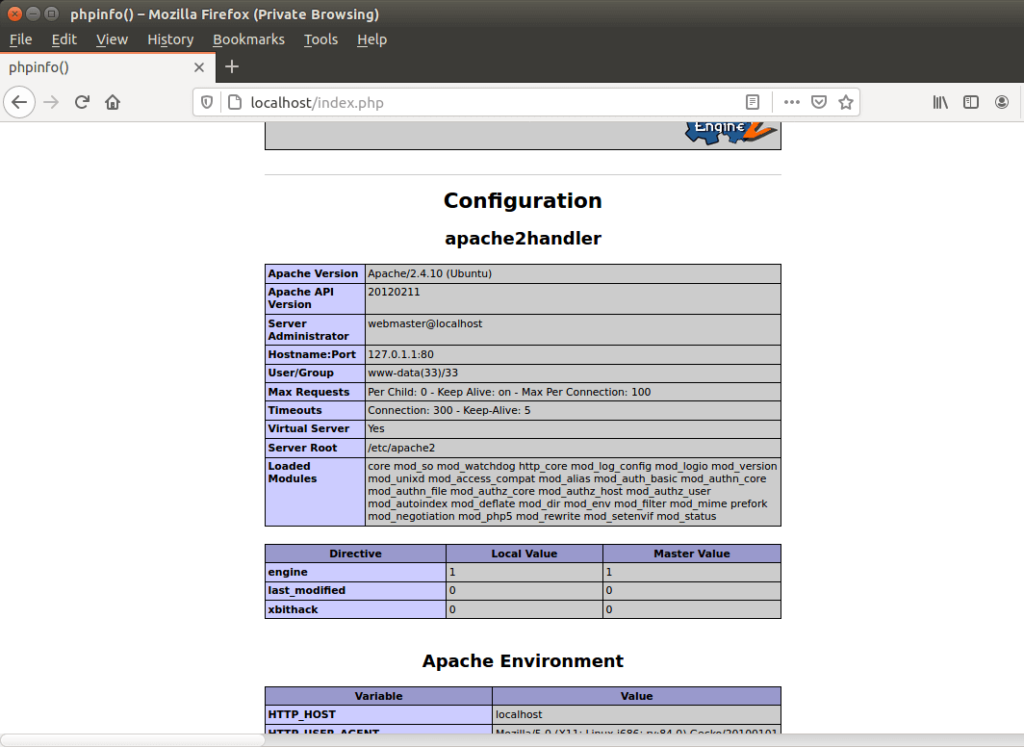
Наконец, используйте nano или ваш любимый редактор, чтобы создать файл index.php в корневом каталоге Apache и сохранить его. Он может содержать простой PHP-скрипт, например:
PHPInfo ();
?>
нано /var/www/html/index.php
Затем посетите свой сервер Apache в своем браузере, чтобы убедиться, что PHP работает по адресу:
IP-адрес веб-сайта /info.php
Если вы находитесь на локальном компьютере, вы можете посетить:
localhost/index.php или
127.0.0.1/index.php
Обратите внимание, что ваш HTTP-сервер Apache настроен на обслуживание файлов *.html перед файлами *.php. И поскольку теперь у вас есть файлы обоих типов в папке «html», просто введите IP-адрес вашего веб-сайта, и вы увидите страницу приветствия Apache в формате HTML.
Чтобы обслуживать PHP по умолчанию, вам потребуется обновить некоторые файлы конфигурации и перезапустить Apache:
sudo nano /etc/apache2/mods-enabled/dir.conf
DirectoryIndex index.html index.cgi index.pl index.php index.xhtml index.htm
Файл должен выглядеть так, как показано выше. Просто замените index.html на index.php и сохраните. Затем перезапустите Apache, чтобы изменения вступили в силу:
sudo systemctl restart apache2
Ввод только IP-адреса вашего веб-сайта или localhost/127.0.0.1 теперь будет обслуживать index.php по умолчанию.
Шаг 4. Установите и настройте WordPress
Настало время загрузить и установить WordPress. Вы делаете это с помощью следующих команд:
cd /tmp #перейти во временный каталог
wget -c http://wordpress.org/latest.tar.gz #загрузить файл
tar -xzvf последний.tar.gz #извлечение
sudo cp -R wordpress /var/www/html/wordpress # перейти в вашу папку html
sudo chown -R www-data:www-data /var/www/html/wordpress #set owner (группа Apache)
sudo chmod -R 775 /var/www/html/wordpress # установить права на выполнение
Шаг 5. Дальнейшие настройки
До сих пор мы работали только с вашим ip-адресом сайта. Чтобы настроить установку WordPress для работы с вашим доменным именем, выполните следующие действия:
sudo nano /etc/apache2/sites-available/mysite.com.conf
Это должно выглядеть так, как показано ниже, просто измените mysite.com на свой домен.
Имя сервера mysite.com
DocumentRoot / var / www / html / wordpress
ErrorLog $ {APACHE_LOG_DIR} /error.log
CustomLog $ {APACHE_LOG_DIR} /access.log в сочетании
AllowOverride All
Затем включите модуль перезаписи Apache, используя:
sudo a2enmod переписать
Эти шаги должны предоставить вам такие причудливые и удобочитаемые URL-адреса, как:
mysite.com/my-first-wordpress-post-url
Чтобы завершить настройку, запустите:
sudo apache2ctl configtest #проверить, что все в порядке
sudo a2ensite mysite.com.conf # добавить новую конфигурацию домена
sudo systemctl перезагрузить apache2 # перезапустить сервер
Шаг 6. Запустите и протестируйте
Настройка WordPress завершена, но вам все еще нужно выполнить окончательную установку. Вы делаете это, перейдя в папку WordPress в браузере и следуя инструкциям:
IP-адрес веб-сайта/wordpress или
mysite.com (если вы установили виртуальный хост)
Вам нужно будет создать учетную запись пользователя и ввести данные базы данных MySQL, которые вы создали ранее. Наконец, нажмите кнопку установки и все.
Заключение
Поздравляю, если вы зашли так далеко. Установить WordPress вручную не так просто, как эти простые варианты в один клик, но это очень приятно. Это также позволяет вам настроить свой сервер по своему желанию.
Имейте в виду, что это только начало. Вам могут понадобиться различные плагины WordPress или расширения PHP в будущем, и они могут потребовать от вас выполнения дополнительной работы на сервере.

Статьи по теме