2026年にコーディングせずにアプリを作成する方法(AndroidとiOS)
あなたのアイデアをモバイルアプリに変えるために燃えていますが、それを機能させるための正しいコードを書くことができませんか? コーディングせずにアプリを作成する方法を確認してください。

スマートフォンアプリは企業にとってますます重要になっていますが、その高い開発コストは中小企業の所有者を怖がらせることがよくあります。 ノーコード開発スキルを備えた企業は、プレミアム料金を請求するフリーランスの開発者や代理店に依存する必要があります。 ただし、現在利用可能な新しいテクノロジーを使用すると、コーディングせずにアプリを作成することもできます。
必要なのは次のようなアプリメーカーだけです アピーパイ そして、XNUMXつの簡単なステップでアイデアを実現して機能させることができます。
モバイルアプリは、あらゆる規模の企業が競争力を維持し、新しい収益源を見つけるのに役立ちます。 そして、スマートフォンユーザーとアプリのダウンロードが増え続けるにつれて、モバイルコマースの明るい未来に疑いの余地はありません。
以下は、コーディングスキルがなくても独自のアプリを作成するのに役立つ簡単なステップバイステップガイドです。 したがって、カスタムアプリがビジネスにもたらすメリットを享受し始めることもできます。
なぜモバイルアプリなのか?
以前はインターネットがXNUMXつありましたが、それ以上はありませんでした。 現在、デスクトップWebとモバイルWebのXNUMXつのインターネットがあります。
デスクトップWebは、1980年代から1990年代にかけて初期のブームを迎えました。 最初のスマートフォンは 1992で発明された、2007年にApp Inc.がiPhoneを発売したとき、「最新のスマートフォン」の登場によりインターネットは一変しました。
今日、モバイルアプリからの収益は数千億ドルに上り、スマートフォンユーザーとアプリのダウンロードは毎年増加しています。
位置情報ベースの検索も非常に有利であり、70%以上がオフライン購入に変換され、全ユーザーの約50%が携帯電話で新製品や新会社を見つけています。
スマートフォンを介したMコマース(モバイルコマース)の取引も増加しており、若い世代がスマートフォンに愛着を持っていることを考えると、モバイルアプリの将来がどうなるかは簡単にわかります。
ノーコード開発のメリット
ノーコード開発により、コードをXNUMX行も記述せずにアプリを作成できます。 これは、経験豊富なプログラマーと非プログラマーを含むすべての人にとって朗報です。
アピーパイ これは、AndroidデバイスとiPhoneデバイスの両方で機能するアプリをすばやく作成する設計環境で可能になります。
視覚的なドラッグアンドドロップ要素を使用して、ビジネスに必要なアプリを作成できます。 レストランの予約から社交活動、その他のeコマースの分野まで、できることには制限がありません。
また、プログラマーであっても、ノーコード開発により、アプリを手動でプログラミングする場合にかかる時間の何分のXNUMXかでアイデアを実行できます。 これは、時間が重要な場合に役立ちます。
とにかく、Appy Pieを使用してアプリを作成することを選択した理由に関係なく、これを実行する手順は次のとおりです。
あなたが必要とするもの
AppyPieでアプリを作成するために必要なもののリストを次に示します。
- クレジットカード: Appy Pieは、本人確認のためにそれを必要とします。 Paypalを通じてシステムの7日間の無料トライアルを利用できます。
- スマートフォン: これは、作成したばかりのアプリをテストするためのものです。
- 数分: 最初のアプリ構築プロセスは高速で、数分しかかかりません。 ただし、設計プロセス全体は、カスタマイズのニーズによって異なります。
コーディングせずにアプリを作成する方法
すべての準備ができたら。 従う手順は次のとおりです。
ステップ1:何を構築するかを決定する
最初のステップは、作成するアプリの種類を決定することです。 AppyPieはアプリで動作します テンプレート、したがって、必要なものに最も近いものをすばやく選択して、後で編集することができます。
プラットフォームの主なテンプレートは次のとおりです。
- オンラインストア
- 年代測定
- 場所と場所
- ラジオとポッドキャスト
- イベント
- 健康とウェルネス
- 教育支援
- レストラン&フード
- ニュース&雑誌
- スタ-トアップ
- 宗教
- その他
これらの各テンプレートには、必要な機能を作成するために必要な重要なモジュールが含まれています。 たとえば、オンラインストア用の配送モジュール、配達用のGeo自動プッシュメッセージングモジュール、クーポン、ソーシャルメディア、イベントカレンダーなどがあります。
ここでの目標は、必要なアプリのタイプに基づいてデフォルトのモジュールをロードすることです。これにより、作業が簡単になります。
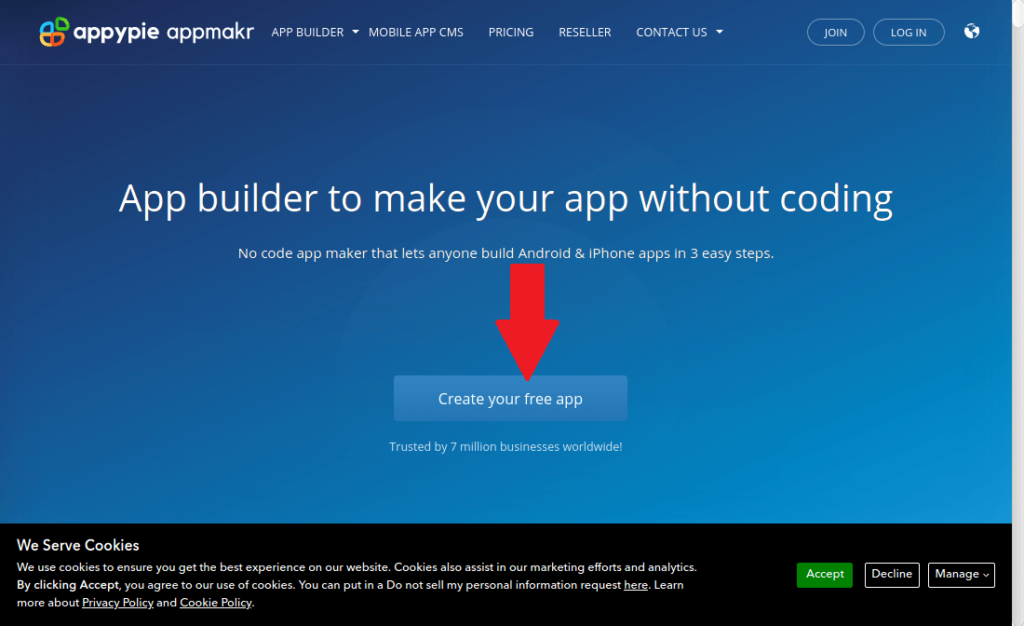
ステップ2:AppyPieWebサイトにアクセスします
必要なものを整理したら、次のステップはAppyPieWebサイトにアクセスすることです。 Appy PieのWebサイトにアクセスするには、ここをクリックしてください。 そこで[無料アプリの作成]ボタンをクリックして、無料アカウントを開始します。
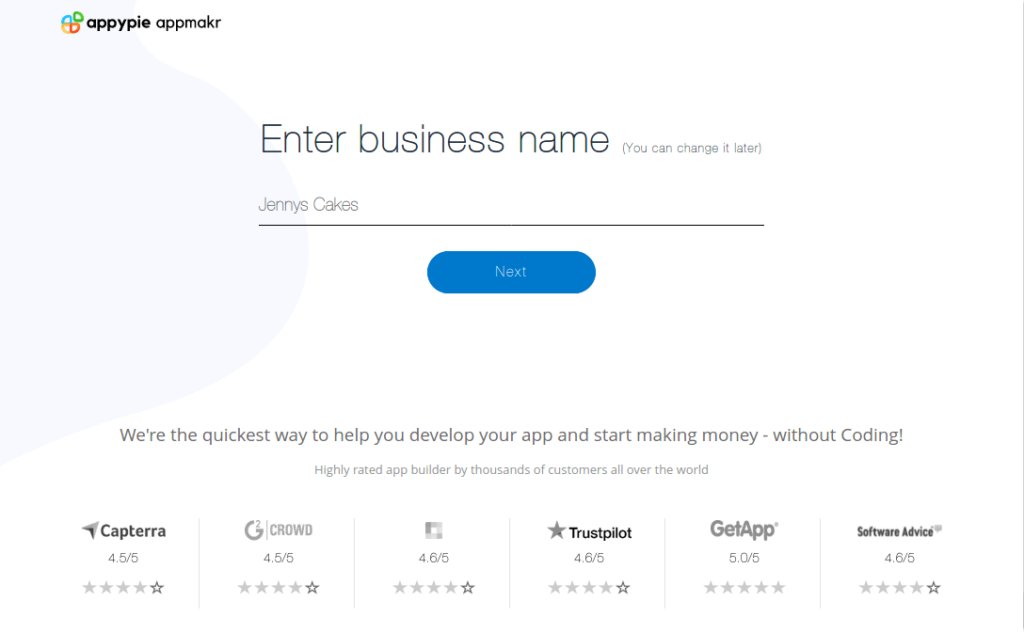
ステップ3:アプリ名を入力します
今があなたのアプリの名前を入力する時です。 任意の名前を入力できますが、システムがそれを受け入れないため、アポストロフィなどの特殊文字には注意してください。
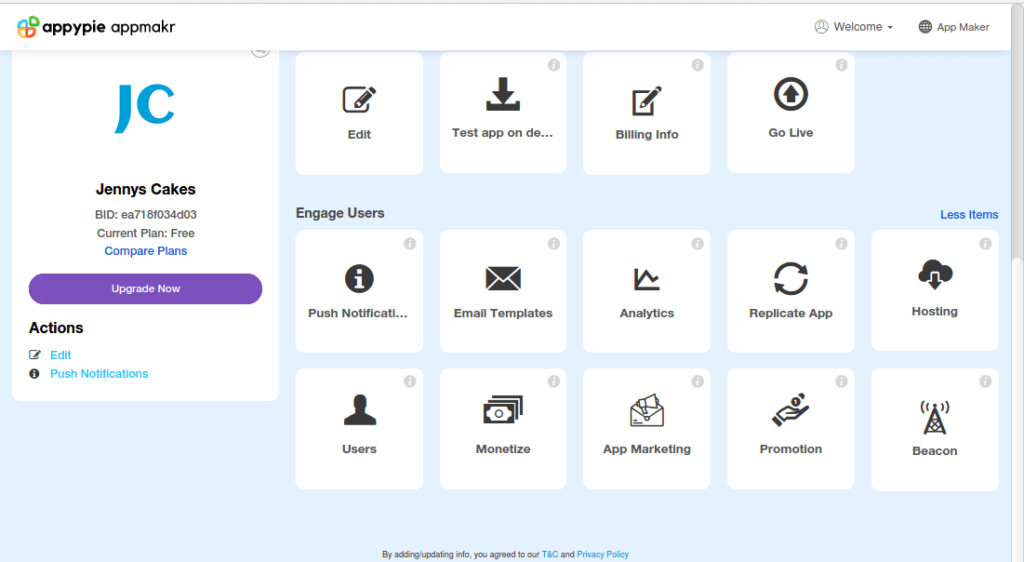
ご覧のとおり、アプリ名として「JennysCakes」を使用しています。 ジェニーはケーキにとても情熱的な隣人です。 彼女は非常に創造的で、自分の仕事が得意です。 だから、アプリを使って彼女の才能を披露するプラットフォームで彼女を驚かせるべきだと思います。
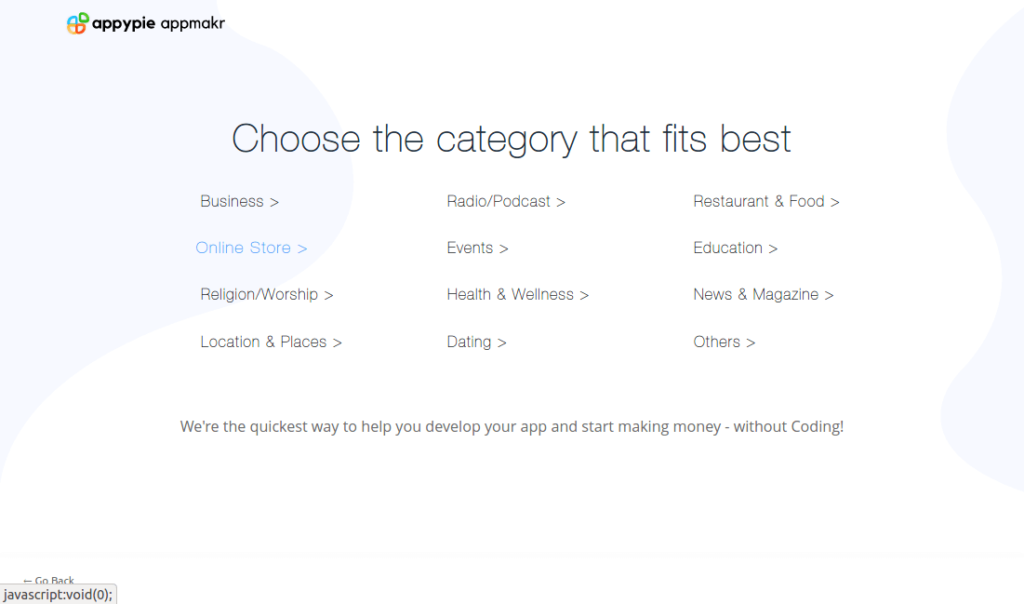
ステップ4:適切なカテゴリを選択する
次に、カテゴリセクションがあります。 テンプレートのように設計されているため、ここでカテゴリを選択すると、同様のアプリのすべての標準モジュールがアプリに事前に入力されます。 後でいつでもさまざまな機能を変更して最適化できるため、心配する必要はありません。
私が作成しているJennysCakesアプリはオンラインストアであるため、ここでは「オンラインストア」カテゴリを選択しています。 これにより、連絡先ページ、問い合わせ、さまざまなケーキのデザインを紹介するカタログなどが読み込まれます。
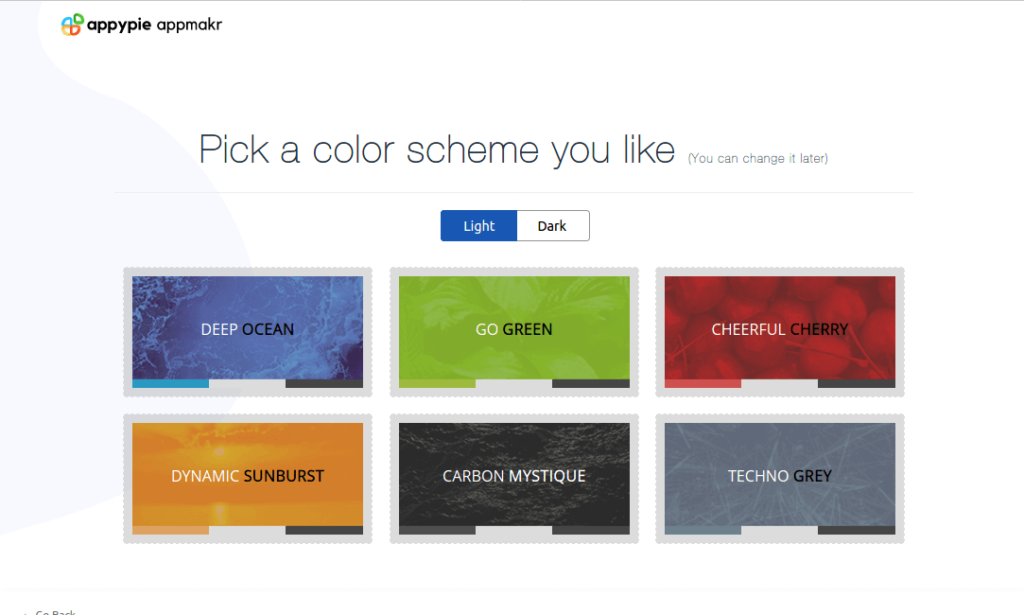
ステップ5:カラーテーマを選択する
これで配色ページが表示されます。このページは、他のほとんどのオプションと同様に、後で変更することもできます。 オプションには、XNUMX色のいずれかを選択し、さらに明るいテーマと暗いテーマのどちらかを選択することが含まれます。
自然に青い「深海」テーマ、緑の「ゴーグリーン」テーマなどがあります。 選択して次に進みます。
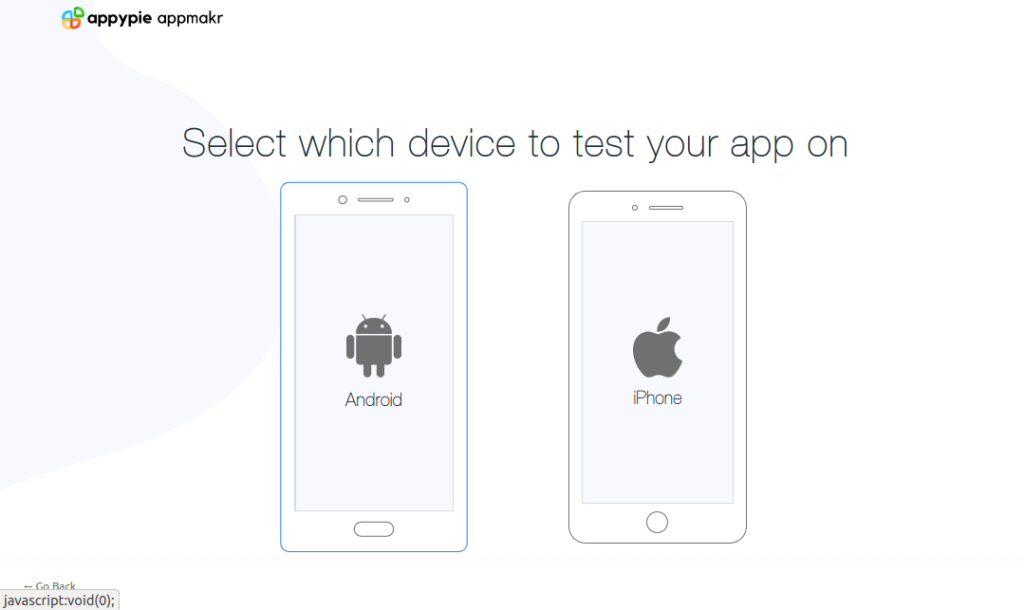
ステップ6:ターゲットデバイスを選択します
Appy PieはAndroidアプリとiPhoneアプリを作成しますが、テスト用にXNUMXつのデバイスを選択する必要があり、それがここで行うことです。
XNUMXつのデバイスのいずれかをクリックして選択するだけで、ほぼ完了です。 Androidを選択しています。
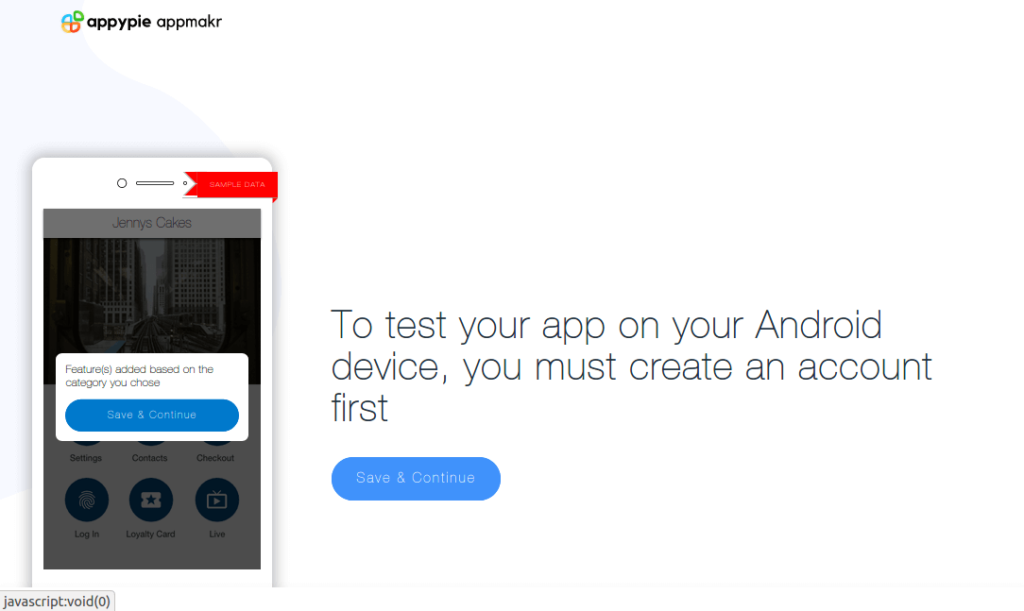
ステップ7:アカウントを保存して作成する
最後に、Appy Pieアカウントを作成します。これにより、プロジェクトを保存し、アプリをダウンロードしてテストするためのリンクを取得できます。
これを行うには、[保存して続行]ボタンをクリックします。
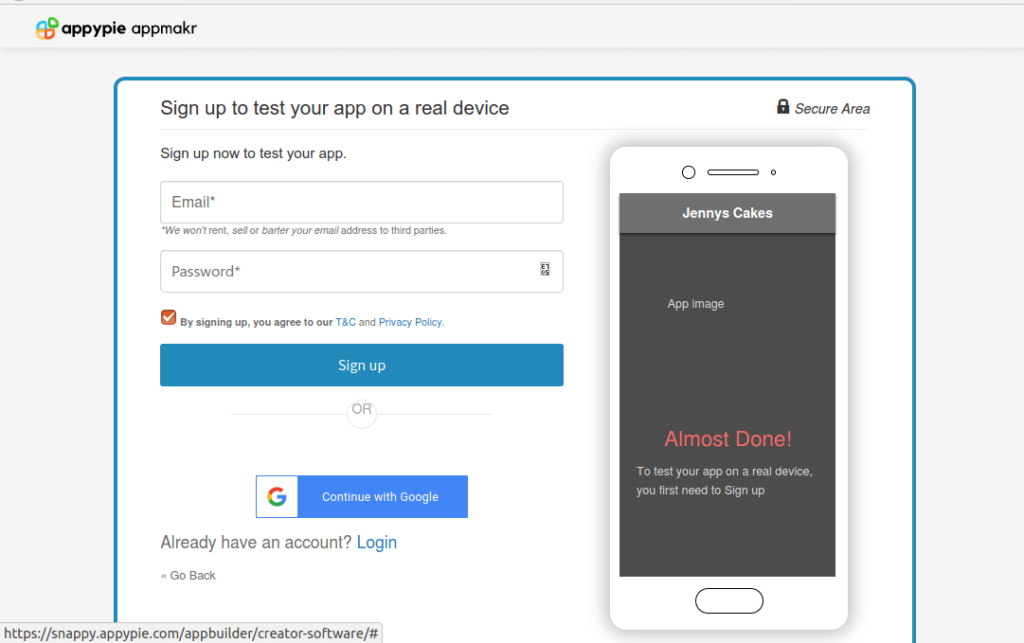
ステップ8:安全なパスワードを使用する
このページには、メールアドレスとパスワードのテキスト入力ボックスがあります。 もちろん、あなたはあなたのメールアドレスを入力する方法を知っている必要があります。
ただし、パスワードには、少なくとも0つの数字(9〜XNUMX)とXNUMXつの特殊文字(@#_-など)を含む小文字と大文字の組み合わせが必要です。 そうでなければ、それは機能しません。
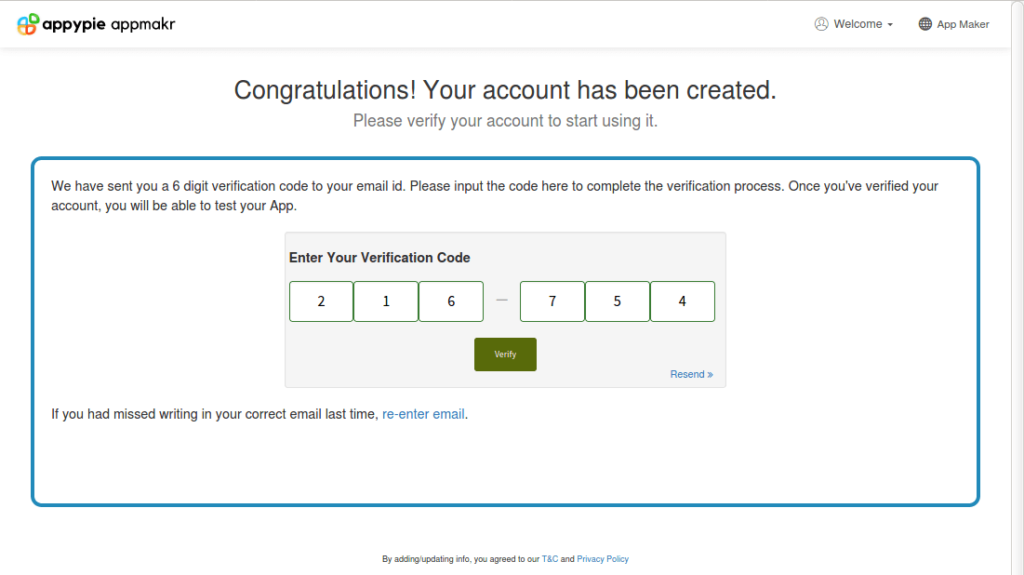
ステップ9:アカウントを確認する
アカウントの作成が成功すると、AppyPieは指定したアドレスに確認メールを送信します。 したがって、別のタブでメールの受信トレイを開き、6桁の確認コードを取得します。
次に、[Appy Pie]タブに戻り、数字を入力し、[Verify]ボタンをクリックして、Webサイトで新しく作成したアカウントを確認します。
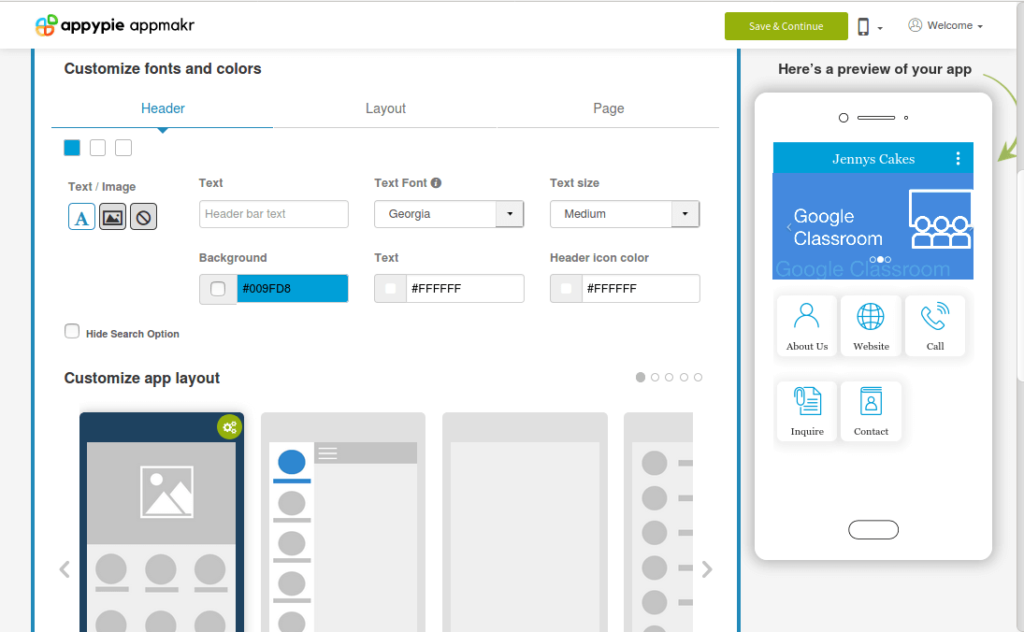
ステップ10:いくつかの編集の時間
アカウントが確認されると、Appy Pieがエディターをロードするので、アプリを好みに合わせてさらに微調整できます。
これらの編集は今すぐまたは後で実行できますが、後でログインするときにクレジットカードの詳細を入力する必要があります。 これは、AppyPieユーザーダッシュボードの機能にアクセスするにはアカウントのアップグレードが必要なためです。 このオファーは、7日間の試用版としてもご利用いただけます。
ここでの編集は主に視覚的なものであり、フォント、ヘッダー、ページ、フッターのレイアウト、色、その他の美的価値をカスタマイズできます。 ログイン時に、より詳細なカスタマイズが可能です。
予備設計が完了したら、[保存して続行]ボタンを押して終了します。
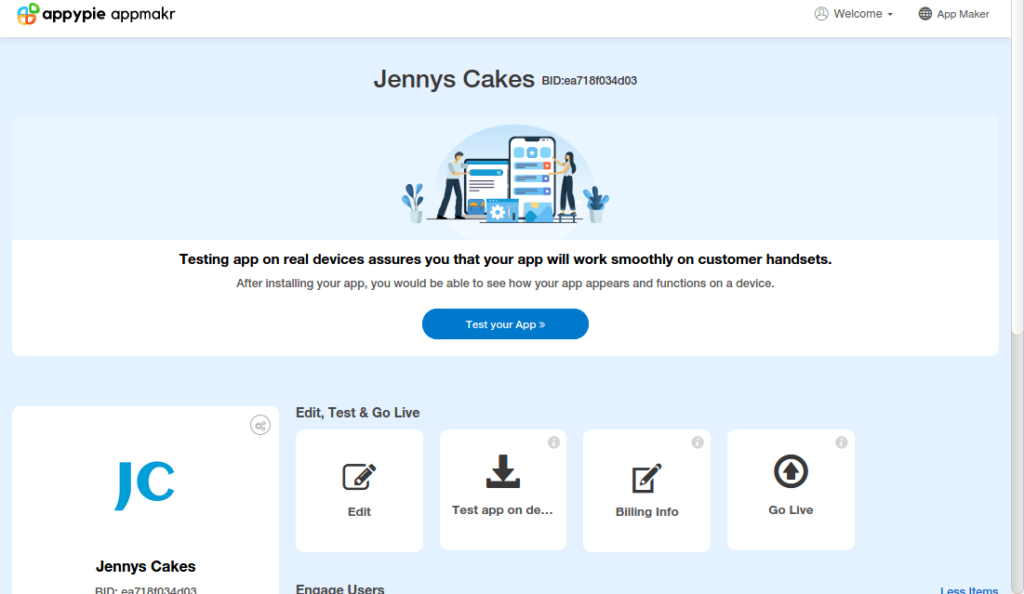
ステップ11:ダウンロードしてテストする
これでアプリが完成し、テストの時間になりました。 しかし、最初に、システムはそれを構築し、ダウンロードリンクを提供する必要があります。 これには最大2分かかることがあるので、しばらくお待ちください。
完了すると、QRコードが記載されたダウンロードページが表示されます。このページを携帯電話でスキャンするだけで、アプリをダウンロードできます。 また、手順が記載されたメールが届きます。または、[リンクをコピー]をクリックしてダウンロードすることもできます。
新しいアプリをテストすると、作成したものが実際にどのように機能するか、何を変更または改善するかを確認するのに役立ちます。
すべてがうまくいけば、最初のアプリの作成おめでとうございます!
アプリを公開する
必要なすべての編集とテストを行い、アプリが世界に向けて準備ができていると感じたら、今度はそれを公開します。 アプリを公開するということは、潜在的なユーザーがアプリを見つけてダウンロードし、インストールできるインターネット上に公開してアップロードすることを意味します。
アプリの公開プロセスは、AndroidアプリをホストするGoogle Playストアから、iPhoneアプリ用のApple App Storeまでさまざまであるため、それぞれでどのように行われるかを知る必要があります。
Appy Pieはパブリッシングサポートを提供しますが、ゴールドプランとプラチナプランのお客様のみを対象としていることに注意してください。
1.GooglePlayストアの公開
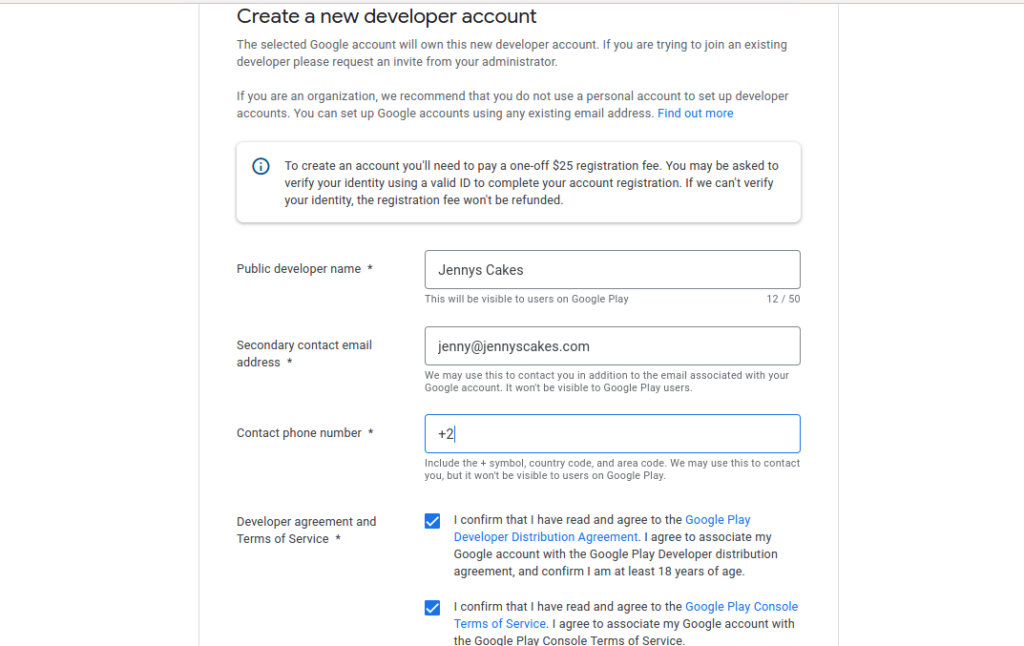
- Googleデベロッパーアカウントを作成します。 PlayストアでAndroidアプリを公開するための最初のステップは、でGoogleデベロッパーアカウントを取得することです。 https://play.google.com/console/signup。 サインアッププロセスは簡単ですが、25ドルのXNUMX回限りの料金が請求されます。 はい、少し費用がかかりますが、それでもAppleのAppStoreで入手できるものよりも安いです。
- マーチャントアカウントにする(オプション):これはオプションの手順であり、アプリの販売またはIAP(アプリ内購入)の提供を計画している場合にのみ必要です。 その場合は、Play Consoleにログインし、[レポートのダウンロード]をクリックして、[今すぐ販売者アカウントを設定する]を選択します。 これにより、アプリにリンクされている財務を管理できるようになります。
- アプリケーションを作成する:次に、[アプリケーションの作成]ボタンをクリックして、アプリの名前、デフォルトの言語、アプリケーションの種類、および無料アプリか有料アプリかを入力します。 また、必要なチェックボックスをオンにして、[アプリの作成]ボタンで確認します。
- ストアリストを作成する:これは、ダウンロード前に潜在的なユーザーがPlayストアで見るものです。 アプリの機能、画像、翻訳、連絡先の詳細、プライバシーポリシー、広告が含まれている場合の回答など、アプリの詳細な説明が含まれています。
- コンテンツの評価:Playストアでの問題を回避するには、すべてのAndroidアプリにコンテンツのレーティングが必要です。 したがって、ダッシュボードから[コンテンツのレーティング]を選択し、提供されたアンケートにできるだけ正直に回答してください。
- 販売:アプリのターゲットオーディエンス、年齢層などの配布も設定する必要があります。
- APKをアップロードします: Googleでは、アプリのリリース方法を選択できます。これは、内部リリースからクローズドテスト、オープンテスト、最終的な本番リリースまで多岐にわたります。 そのため、アプリのオプションから[リリース管理]と[アプリのリリース]を選択して、必要なものを選択します。 最初に確認できるように、ここでテストリリースを使用することをお勧めします。
- アプリをロールアウトする:テストに満足したら、次のステップはリリースを確認して最終的にロールアウトすることです。 まず、すべての入力が正しいことを確認してから、[レビュー]をクリックして問題がないことを確認します。 最後に、[ロールアウトの確認]をクリックして、アプリを世界中またはターゲットユーザーに公開します。
2. AppleAppStoreの公開
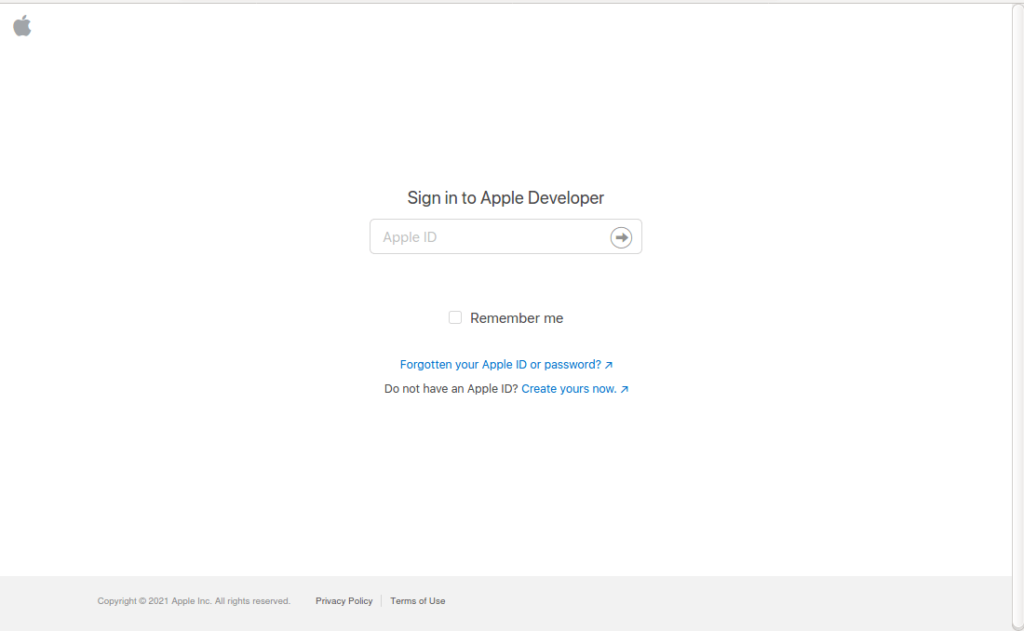
- AppleDeveloperアカウントを作成する:iPhoneアプリを公開するための最初のステップは、次の場所でAppleDeveloperアカウントを作成することです。 https://developer.apple.com/programs/enroll。 これにはAppleIDと99ドルの年会費が必要です。 年払いの期限が切れるとアプリが機能しなくなり、延長しないことに注意してください。
- ログインしてガイドラインを確認する:登録が完了したら、次のステップはApp Store Connectシステムにログインすることです(https://appstoreconnect.apple.com)ダッシュボードと環境に慣れます。 また、ガイドラインを確認してください。 https://developer.apple.com/app-store/review/guidelines、レビュープロセスは厳格になる可能性があるためです。
- 有料アプリケーション契約(オプション): これはオプションであり、有料アプリにのみ適用されます。 サインインした後、App Store Connectダッシュボードの[Agreements、Tax、and Banking]ボタンをクリックします。[RequestContracts]で契約をリクエストし、契約を確認して送信します。 最後に、連絡先、銀行、税務情報など、「処理中の契約」の下に関連情報を追加します。
- アプリの作成を開始します:アプリの公開プロセスを開始するには、AppStoreConnectダッシュボードの[マイアプリ]をクリックしてフォームに入力します。 いつでも「?」をクリックできますあなたが理解していないアイテムの近く。
- アプリを構成する:App Storeには、アプリ名、カテゴリ、プライバシーポリシー、対象ユーザー、言語、バージョン管理、リリースオプションなどが必要です。
- スクリーンショットを作成してアップロードする:Appleにはあなたが固執する必要のある仕様があるので、これは覚えておくべきもうXNUMXつの重要なポイントです。 ここで仕様を調べることができます: https://help.apple.com/app-store-connect/#/devd274dd925.
- XcodeまたはTransporterでアップロード: MacプログラムXcodeを使用すると、必要な証明書を含むアプリのコードを簡単にアップロードできます。 Appy Pieを使用してアプリを作成した場合、「。CSR」証明書は、AppyPieダッシュボードの「稼働」タブからダウンロードできます。 Xcodeは現在12番目のバージョンですが、Transporterアプリも優れた代替手段です。
- レビューのためにアプリを送信する:アプリをアップロードしたら、次のステップはビルドセクションに移動し、アプリを選択して、画面の右上にある[完了]、[保存]の順にクリックします。 最後に、[レビューのために送信]をクリックします。これで完了です。
詳細なカスタマイズ
お気づきのように、作成したばかりのアプリはまだ希望どおりのものではないため、引き続きカスタマイズする必要があります。 Appy Pie Webサイトのユーザーアカウントには、それを実行し、アプリを最大限に活用するのに役立つ多くのツールが含まれています。
以下は、ニーズに応じて、プロジェクトに追加、編集、またはプロジェクトから削除できるモジュールの一部です。
- オーディオ。 オーディオ機能の場合
- デート。 デート機能を提供するモジュール
- データベース。 アプリでデータストレージを実行する必要がある場合
- 電子商取引。 購入および支払い機能の場合
- CRM。 カスタマー·リレーションシップ·マネージメント
- IAP。 アプリ内購入は、より多くのお金を稼ぐのに役立ちます
- ログインしてください。 このモジュールは、セキュリティとアクセス制御を提供します
- フォームビルダー。 情報を簡単に取得するのに役立ちます
- フィットネス。 健康に焦点を当てたアプリのための素晴らしいモジュール
- 寄付。 教会や非営利団体に最適
- チャット/チャットボット。 カスタマーサービスの向上に役立てるため
アプリ内で機能するモジュールに加えて、ユーザーダッシュボードには追加のツールもあります。 これは、アプリの全体的な管理に役立ちます。
これらのツールのいくつかは次のとおりです。
- ホスティングオプション
- プッシュ通知
- ユーザー管理
- 電子メールテンプレート
- 現金化オプション
- プロモーションとアプリのマーケティング
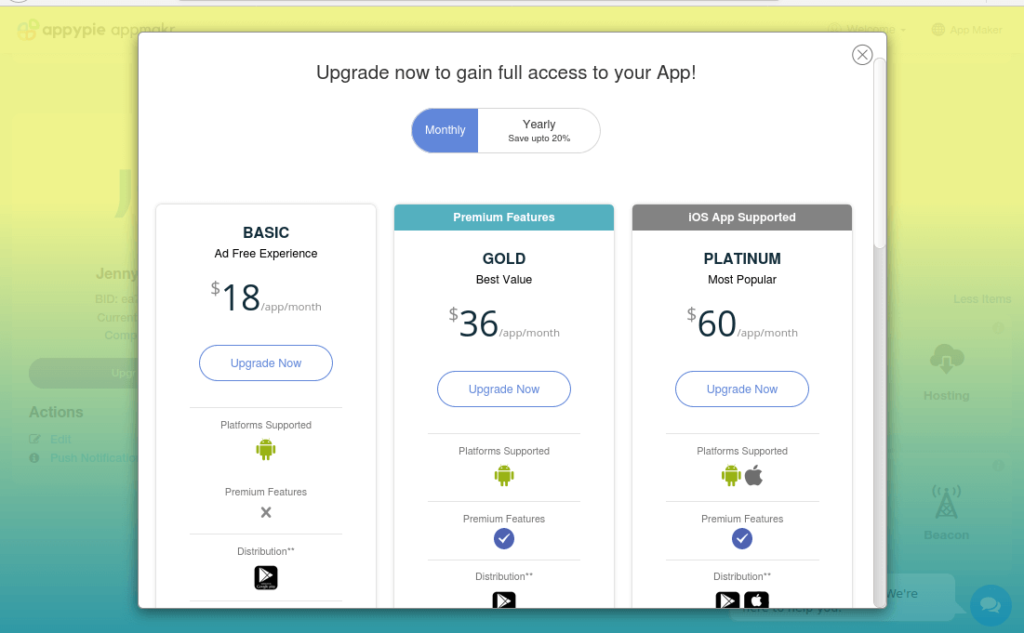
AppyPieの計画を見てください
Appy Pieは3種類のユーザーアカウントを提供しており、これは必要な機能によって異なります。 基本プランは18ドル、ゴールドプランは36ドル、プラチナプランは60ドルです。
すべてのプランはアプリごとに月額料金が発生することに注意してください。 そのため、AppyPieで作成する個別のアプリごとに計画が必要です。
- 基本計画。 これは、プラットフォーム上で最も手頃なプランです。 Androidプラットフォームのみをサポートしますが、アプリの無制限の編集、月に最大10,000のプッシュ通知、および支払いが必要になる前の最大5,000の無料ダウンロードが含まれます。
広告を配信し、分析を含めることができますが、GoogleのPlayストアでのアプリの公開はサポートされていません。また、拡張現実、アプリ内購入、不動産などのAppyPieのプレミアム機能も付属していません。ソーシャルネットワーク、およびその他のモジュール。 - ゴールドプラン。 基本プランと同様に、ゴールドプランはAndroidでのみ利用できますが、基本プランにはないプレミアム機能と、アプリの公開におけるAppyPieのサポートが含まれています。
このプランは、基本オファーの25,000倍の費用がかかり、月額10,000で基本プランの最大プッシュ通知のXNUMX倍以上も提供します。 さらに、追加料金が請求される前に、最大XNUMX回のダウンロードが可能です。 - プラチナプラン。 プラチナプランでは、AndroidアプリとiPhoneアプリの両方のサポートから始まり、月に最大750,000のプッシュ通知、最大50,000の無料ダウンロードなど、AppyPieの最高のサービスを利用できます。
ベーシックプランはメールサポートのみを提供し、ゴールドはメールとチャットのサポートを提供しますが、プラチナプランはメール、チャット、通話のサポートをアプリあたり月額60ドルで提供します。
結論
コーディングせずにアプリを作成するのがいかに簡単かを見てきました。 また、アプリの作成は、目標と夢のビジネスへの第一歩にすぎないことにも気付いたと思います。

関連記事